How to set ssh with asymmetric keys on servers Back
1. Generate asymmetric keys private/public
Linux/Mac
ssh-keygen -t ed25519 -o -a 100 -C "comment here"
ssh-keygen -t rsa -b 4096 -o -a 100 -C "comment here"
- t: types of key
- C: used to tag who the certification belongs to
- passphrase: the password to protect private key, which can be empty.
Notice that: In general, keys will be saved in the .ssh directory of the root, in which id_rsa is the private one while id_rsa.pub is the public one
Windows
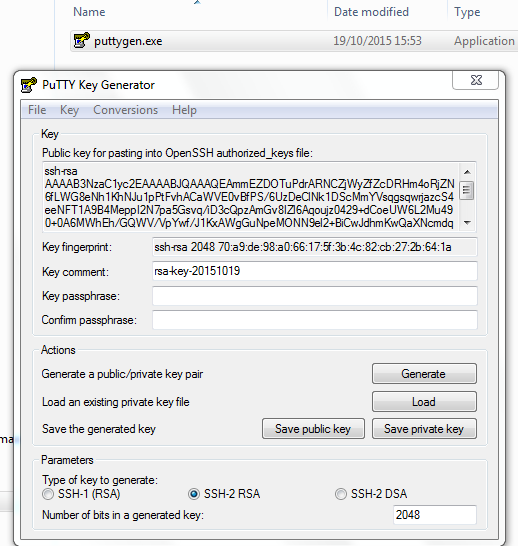
In Windows, we can use PuTTY to generate private/public keys:

SSH-2 RSA is the default type of keys and number of bits should be 4096 nowadays.
Public Key: please copy the key in the top box
2. Configure ssh on servers
Generally, servers will use SSH logging in servers provided by OpenSSH, and we should configure it with modifying sshd_config
In CentOS and Ubuntu, this file should be in /etc/ssh/
vim /etc/ssh/sshd_config
Port
Port is 22 by default, and it's suggested that we should change it to a number between 2001 and 65534
Notice that: after changing the port, you should add new port to the white list when firewall is opened like iptables or FirewallD in CentOS
firewall-cmd --zone=public --add-port=2222/tcp --permanent
Protocol
In general, we should not use protocol 1 without any special reason:
# /etc/ssh/sshd_config
Protocol 2
Login
Prevent logging in with empty password:
PermitEmptyPasswords no
Allows user groups when the server is used by more than one person:
# /etc/ssh/sshd_config
# AllowUsers user1 user2
AllowGroups ssh-users
Here is the way to create a group and add users into it:
groupdd ssh-user
usermod -a -G ssh-user <username>
To avoid that users have set a wrong priority for some important files, which will result in prevention from logging in:
# /etc/ssh/sshd_config
StrictModes no
Allow logging in with keys:
# /etc/ssh/sshd_config
RSAAuthentication yes
PubkeyAuthentication yes
AuthorizedKeysFile %h/.ssh/authorized_keys
Optional
Prevent logging in with passwords:
# /etc/ssh/sshd_config
PasswordAuthentication no
ChallengeResponseAuthentication no
Notice that: this way will make you trouble with locking you out of the server
Ask for detailed logs:
# /etc/ssh/sshd_config
LogLevel VERBOSE
Allow SFTP like FileZilla to log in:
# /etc/ssh/sshd_config
Subsystem sftp /usr/local/ssh/libexec/sftp-server
3. Import public keys into servers
For the first key
scp ~/.ssh/server_rsa.pub root@<host>:~/.ssh/authorized_keys
For next/multiple keys
scp root@<host>:.ssh/authorized_keys ~/.ssh

cat ~/.ssh/server_rsa.pub >> ~/.ssh/authorized_keys

scp ~/.ssh/authorized_keys root@<host>:~/.ssh/authorized_keys

# or

ssh-copy-id -i ~/.ssh/server_rsa.pub root@<host>
# /root/.ssh/authorized_keys
ssh-rsa AAAAB3NzaC1yc2EAAAADAQABAAACAQDPXJQwmoTAuSysd7wdX6QUyZLzKmwPZ+suk2En//rO+jqISSxFxvODVvxlJKdFuh7QpRSNhsY3QX6phknajo/oY+AFFhSS2RaNgTuLzAhi2gROIjy3sDCzgnDwotrwfugcFvhXXdPWRm2D8HbUfkmcrcYSDaJGYyB99vbJ3I6HMomxOgO8uo3i+LjESN7UX6bjFr5LNqPJ3zohXCF6HVKUdZ5nqeqFcfd1DZvb5pWyOkDr8ko0Br0n+zmMM/A5DlIgUh3zM9jn/CYHU2y2mPRa8jfZAhka1FxCu4AvJWZXsv/70o/cqDR5fqHsc8thiHpemJ4TTppqfKlXcOAhk1VdZV7BY7jyRX47kd21vZOolVmNSJ7i5reIAyPhLzXQrPhci9E1ol+OLQEywiPDfHOwnqmfjmxZJamOjGSzoWKrY/Yg3iC02/aua5uOOXGZVP71d12X9Fy7wdjwWh3vaHj23OeY020H4ffvp2xhd099T5sdL30Q5FCJ92E5d048WOILpRMeKE4e3pBvpygnjR9MqEtAOPTp7P4bw00WmJumQO4GqIDOMK80IxJ1OdLB2/awVaAXOB1HddKiCAR7XeBKqMcOJ+K3feyotFrujczNvp89EDWs1WSZ/ViXkX5dKxqHg+ErB4t8SITpc/BDvlWUg37GzTShh5uJlOes1qcDHQ== aleen's key
Mac
In Mac, you can directly log in with:
ssh root@<host>
Ubuntu
In Ubuntu, you'll find the error Error: Agent admitted failure to sign using the key, it means that your client is not yet managing the key, and you should add it as follow to log in:
SSH_AUTH_SOCK=0 ssh -i ~/.ssh/server_rsa root@<host>
Windows
- PuTTY:
- double clicked to open putty
- input IP, Port in the right side box Basic options for you PuTTY session, and then click SSH, and enter a name like ssh-to-server to Save.
- click Connection, SSH, Auth in the left side box Category and Browse the private key you generate in the right side, and click Open
- enter user name root to log in
- FileZilla:
- open FileZilla and click Edit > Settings
- choose SFTP in the left side and browse the private key with the button Add key file
- set your SFTP with IP, Port, Protocol which should be SFTP - SSH File Transfer Protocol and, Logon Type, which should be Normal
- then connect with the name root and a empty password