Forms Back
- Forms has referred to a printed document that contains spaces for you to fill in information.
- Information from a form is sent in name/value pairs.
Types:
- Adding Text:
- Making Choices:
- Submitting Forms:
- Uploading Files:
Process:
- A user fills in a form and then presses a button to submit the information to the server.
- The name of each form control is sent to the server along with the value the user enters or selects.
- The server processes the infromation using a programming language for back-end development such as PHP, C#, VB.net or Java. Sometimes data is also stored in a database.
- The server creates a new page to send back to the browser so that users can get the feedback of submitting successfully.
1. Form Structure
<form>includes form controls.- attribute
actionindentifies where to send the information - attribute
methodindentifies how to send the information(get/post)- get: get information form the server
- poset: send information to the server
<form action="http://www.example.com/subscribe.php"
method="get">
    <p>This is where the form controls will appear.</p>
</form>
2. Text Input
<input>is used to create input box.- attribute
typewill create a single-line text input when is text. - attribute
nameis used to distinguish different input for the server. - attribute
size(should not be used in new form) - attribute ``maxlength``` is used to limit input.
<form action="http://www.example.com/login.php">
    <p>Username:
        <input type="text" name="username" size="15" maxlength="30" />
    </p>
</form>

3. Password
- It cannot be used to send sensitive data such as credit card numbers.
- attribute type is set as the value of 'password' resulting in that characters are blocked out and hidden.
<form action="http://www.example.com/login.php">
    <p>Password:
        <input type="password" name="password" size="15" maxlength="30" />
    </p>
</form>

4. Text Area
<textarea>is used to create a multi-line text input.- attribute
colsandrowsare used to indicate how big the text area should be. - we can use JavaScript to clear when information has been sent to the server.
<form action="http://www.example.com/comments.php">
    <p>What did you think of this gig?</p>
    <textarea name="comments" cols="20" rows="4">Enter your comments...</textarea>
</form>

5. Radio Buttons
- attribute type is set as the value of 'radio' resulting in that user can just pick only one of a number of options.
- attribute value indicates the value that is sent to the server for the selected option.
- attribute checked indicates which option will be selected when the page loads.
<form action="http://www.example.com/profile.php">
    <p>Please select your favorite genre:
    <br />
    <input type="radio" name="genre" value="rock" /> Rock
    <input type="radio" name="genre" value="pop" /> Pop
    <input type="radio" name="genre" value="jazz" checked="checked" /> Jazz
    </p>
</form>

6. Checkbox
- attribute type is set as the value of 'radio' resulting in that user can pick one or more than one options.
<form action="http://www.example.com/profile.php">
    <p>Please select your favorite music service(s):
    <br />
    <input type="checkbox" name="service" value="itunes" checked="checked" /> iTunes
    <input type="checkbox" name="service" value="lastfm" checked="checked"/> Last.fm
    <input type="checkbox" name="service" value="spotify" /> Spotify
    </p>
</form>

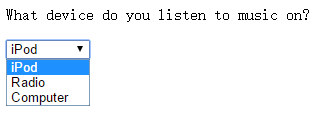
7. Drop Down List Box
- allows users to select one option from a drop down list.
<select>is used to create a drop down list box.<option>is used to specify what options can be selected.- attribute selected indicates which option is selected when the page loads.
- attribute size indicates how many options are shown at once.
<form action="http://www.example.com/profile.php">
    <p>What device do you listen to music on?</p>
    <select name="devices">
        <option value="ipod">iPod</option>
        <option value="radio">Radio</option>
        <option value="computer">Computer</option>
    </select>
</form>

- attribute multiple indicates that users can select one or more than one options.
<form action="http://www.example.com/profile.php">
    <p>Do you play any of the following instruments? (You can select more than one option by holding down control on a PC or command key on a Mac while selecting different options.)</p>
    <select name="instruments" size="3" multiple="multiple">
        <option value="guitar" selected="selected">Guitar</option>
        <option value="drums">Drums</option>
        <option value="keyboard" selected="selected">Keyboard</option>
        <option value="bass">Bass</option>
    </select>
</form>

8. File Upload
- attribute type is set as the value of 'file' resulting in that user can upload a file by a browse button.
<form action="http://www.example.com/upload.php"
method="post">
    <p>Upload your song in MP3 format:</p>
    <input type="file" name="user-song" />
    <br />
    <input type="submit" value="Upload" />
</form>

9. Submit Button
- attribute type is set as the value of 'submit' resulting in sending a form to the server.
<form action="http://www.example.com/subscribe.php">
    <p>Subscribe to our email list:</p>
    <input type="text" name="email" />
    <input type="submit" name="subscribe" value="Subscribe" />
</form>

10. Image Button
- attribute type is set as the value of 'image' resulting in that a button can be designed by an image.
<form action="http://www.example.org/subscribe.php">
    <p>Subscribe to our email list:</p>
    <input type="text" name="email" />
    <input type="image" src="./subscribe.png
" width="100" height="20" />
</form>

Different Form Controls
1. Button & Hidden Controls
<button>allows other elements to appear inside the button.- attribute type is set as the value of 'hidden', so that developers can collect information while users cannot see the control.
<form action="http://www.example.com/add.php">
    <button><img src="images/add.gif" alt="add" width="10" height="10" /> Add</button>
    <input type="hidden" name="bookmark" value="lyrics" />
</form>
2. Labelling Form Controls
<label>can be used in two waysWrap around(迴繞) both the text description and the form input.
<label>Age: <input type="text" name="age" /></label>attributes
foris used to sperate label from the form control, and indicate which form control the label is for.<input id="female" type="radio" name="gender" value="f"> <label for="female">Female</label> <input id="male" type="radio" name="gender" value="m"> <label for="male">Male</label>
when
<label>is used with a checkbox or radio buttion, users can click on either the form control or the label to select.- best places to place labels on form controls:
- ABOVE OR THE LEFT
- Text inputs
- Text areas
- Select boxes
- File uploads
- RIGHT
- Individual checkboxes
- Individual radio butions
- ABOVE OR THE LEFT

3. Grouping Form Elements
<fieldset>can be used to group related form controls together, and most browsers will show it with a line around, whose appearence can be adjsted using CSS.<legend>is used to describe the group
<fieldset>
    <legend>Contact details</legend>
    <label>Email:<br />
        <input type="text" name="email" />
    </label>
    <br />
    <label>Mobile:<br />
        <input type="text" name="mobile" />
    </label>
    <br />
    <label>Telephone:<br />
        <input type="text" name="telephone" />
    </label>
</fieldset>

4. HTML5 properties
1. Form Validation
- attributes required is set as 'required' to restrict that users should fill out this form control in HTML5. (Form Validation(有效性))
- generally Form Validation has been performed using JavaScript, but HTML5 has left this work to the browser.
- Form Validation has ensured that the information users enter can be understood by the server.
<form action="http://www.example.com/login/" method="post">
    <label for="username">Username:</label>
    <input type="text" name="username" required="required" />
    <br />
    <label for="password">Password:</label>
    <input type="password" name="password" required="required" />
    <input type="submit" value="Submit" />
</form>

2. Date
- attribute type is set as the value of 'date', so that users can select a date with the special form in HTML5.
<form action="http://www.example.com/bookings/" method="post">
    <label for="username">Departure date:</label>
    <input type="date" name="depart" />
    <input type="submit" value="Submit" />
</form>

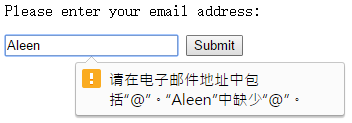
3. Email
- attribute type is set as the value of 'email', so that users can input an email address with the special form in HTML5.
<form action="http://www.example.org/subscribe.php">
    <p>Please enter your email address:</p>
    <input type="email" name="email" />
    <input type="submit" value="Submit" />
</form>

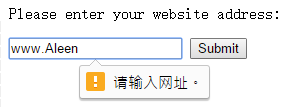
4. URL
- attribute type is set as the value of 'url', so that users can input a url address with the special form in HTML5.
<form action="http://www.example.org/profile.php">
    <p>Please enter your website address:</p>
    <input type="url" name="website" />
    <input type="submit" value="Submit" />
</form>

5. Search
- attribute type is set as the value of 'search', so that users can input search content with the special form in HTML5.
- attribute placeholder is set as default to describe what users should enter.
<form action="http://www.example.org/search.php">
    <p>Search:</p>
    <input type="search" name="search" placeholder="search..."/>
    <input type="submit" value="Search" />
</form>

